This chapter contains the following topics:
Introduction to Purchasing Addresses
Printing a List of Purchasing Addresses
Sometimes a vendor may supply you with goods from one or more locations, which are different from that vendor’s remittance address. This would be the case when you purchase from a vendor’s branch locations but make payments to his home office or corporate headquarters.
A purchasing address is the address to which you send the voucher or purchase order authorizing the buy. It may be different from the vendor address (the address to which you send payment).
Use this selection to enter addresses for those vendors who have one or more purchasing addresses distinct from their vendor address.
There is no relationship with purchasing addresses and pay-to addresses. If you want to send a payment to an address, other than the vendor address use pay-to addresses. For more information, see Pay-to Addresses in the Vendors chapter.
If you are interfaced to the Purchase Order module, be aware that the A/P Purchasing addresses selection is identical to the selection of the same name in P/O. There are not two files/tables, but only one, accessible from either module.
If you do not use P/O, this selection is optional. You may still find it useful, either to write purchase orders manually or to enter them into someone else’s P/O module. Be aware however that purchasing addresses are not utilized elsewhere within A/P.
Select
Purchasing addresses from the A/P menu.
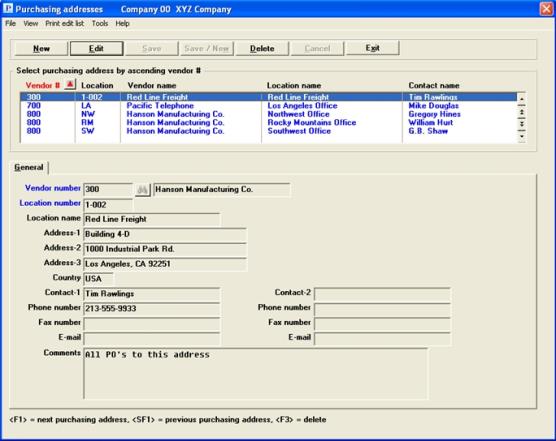
From the screen that appears, you can work with both new and existing purchasing addresses.
Graphical Mode
You select an existing purchasing address for editing or viewing using the list box.
The list box displays up to 6 purchasing addresses at a time. You may sort the purchasing addresses by vendor number in ascending or descending order. Only column names in red may be sorted. Click on the column name or the arrow to the right of the column name to change the sort or use the View options.
To locate a purchasing address, start typing the vendor number. You may also use the up/down arrows, Page up, Page down, Home and End keys to locate an item. The <F1> and <SF1> keys are the same as the up/down arrow keys.
Purchasing addresses that display in the list box are available for changes or deletion. The fields for the selected purchasing address display in the lower part of the screen.
When a purchasing address is found, you may select the <Enter> key or Edit button to start editing.
You may select a button or keyboard equivalent for editing, deleting or adding a new purchasing address:
| Button | Keyboard | Description |
|
New |
Alt+n |
To enter a new purchasing address |
|
Delete |
Alt+d |
To delete the purchasing address selected in the list box. You may also use the <F3> key |
|
Edit |
Alt+e |
To edit the purchasing address selected in the list box |
|
Save |
Alt+s |
To save a new purchasing address or changes to an edited purchasing address |
|
Save/New |
Alt+w |
Same as Save button plus the New button |
|
Cancel |
Alt+c |
To cancel adding or editing a purchasing address |
|
Exit |
Alt+x |
To exit the screen. You may also use the <Esc> key |
Menu Selections
At the top left of the screen menu selections are available. Most of these are the same from screen to screen. Some of these selections may be restricted. If the menu selection is grayed out, then you will not be able to access it. The selection that is unique to this screen is explained here:
Selecting the Print menu accesses the Purchasing address list. See Printing a List of Purchasing Addresses
Character Mode
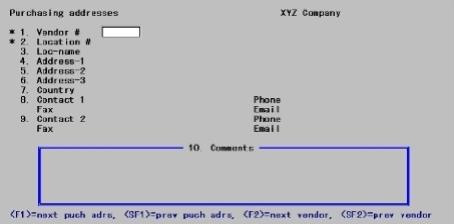
Enter the following information:
Enter the vendor number. To locate a vendor, you may click on the lookup button or select <F8> for a list of vendors. When using the lookup you also have these options:
|
<F8> |
For selecting a vendor from a list a vendors. From the vendor list window you may select the More info button to view the full data about the vendor. You may also access vendor history from the Options menu |
Options
In character mode you may also use one of the following options to locate a purchasing address or vendor:
|
<F1> |
For the next purchasing address on file (regardless of vendor) |
|
<SF1> |
For the previous purchasing address |
|
<F2> |
For the next vendor on file, whether or not there is any purchase address on file for this vendor. |
|
<SF2> |
For the previous vendor |
|
Format |
6 characters |
|
Example |
Type 300 |
Upon selection of a valid vendor number, its vendor name displays adjacent to it.
In character mode, if <F1> or <SF1> is used to locate an existing entry, that entry’s information displays on the screen and the cursor moves to Field number to change?. Otherwise, the cursor moves to the Location number field.
Enter a number to identify this purchase location. Location code is required.
Each one of a vendor’s locations must have a different location number, but the same location number can be used for different vendors if desired.
In graphical mode, if the number of an existing location is entered this message displays:
Purchasing address already on file. Would you like to change it?
Select Yes to edit the record or No to return to the field to enter a different location number.
In character mode, if the number of an existing location is entered, that entry’s information displays on the screen, and the cursor moves to Field number to change?. Otherwise, the cursor moves to the Location name field.
|
Format |
5 characters |
|
Example |
Type 1-002 |
Options
Location name is optional and may be left blank. Enter the name of the company at this purchasing address, or use the option:
|
<F2> |
To use the vendor name as the location |
|
Format |
25 characters |
|
Example |
Press <F1> |
Each address line is optional. State and zip code are not separate fields and are not validated; you can enter them in any of the address lines. If you expect to be using any utility module to access purchase addresses by state or zip, adopt your own standard for locating these fields.
|
Format |
30 characters for each line |
|
Example |
Type Building 4-D Type 1000 Industrial Park Rd. Type Los Angeles, CA 92251 |
Enter a country code, or leave blank for U.S.A.
|
Format |
3 characters |
|
Example |
Press <Enter> |
Contact-1, Phone number, E-mail, Fax number
Contact-2, Phone number, E-mail, Fax number
Enter the names of the primary and secondary contact for this location. For each contact, you may enter his telephone number, his Fax number, and his e-mail address.
| • | Both contacts are optional. You can have a secondary contact even if you don’t have a primary one. |
| • | All four fields for each contact are optional. For example, you can know the contact’s telephone number without knowing his name. |
| • | No formatting rules are enforced for any of these fields. If you expect to be using any utility module to sort data by area code, you should adopt your own standard for phone number format. |
|
Format |
25 characters for each field |
|
Example |
Type Tim Rawlings Type 213-555-9933 Press <Enter> six times. |
Enter any comments about this purchasing address. Comments are optional, and when used are entered like Notes.
For character mode refer to the Using Notes section of the User of Function Keys, ToolBar and Windows chapter in the System User documentation.
|
Format |
Five lines of 65 characters each |
|
Example |
Type All POs to this address Press <Enter> Press <Esc> Press <Enter> |
Options
Make any needed changes.
In character mode, if this is an existing entry, you may also use the option:
|
<F3> |
To delete this entry |
Upon pressing <Enter> with this field blank, the screen will clear for the next entry.
This selection lets you print a list of purchasing addresses. The vendor’s billing address is printed as well as all his purchasing addresses. Vendors who have only a billing address are not included. Selection is by vendor, not by purchasing address. If a vendor is included on the report at all, all his purchasing addresses are included as well.
Select
Purchasing addresses from the Reports menu.
The following screen appears:
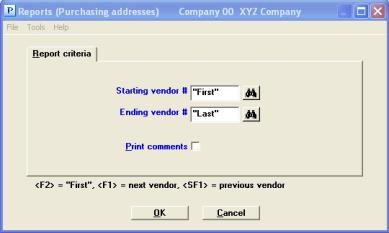
Enter the following information:
Starting vendor #
Ending vendor #
Options
Enter the range of vendor numbers you wish to include on the report. You may also use the option:
|
<F2> |
For the "First" starting vendor or "Last" ending vendor |
|
<F8> |
For selecting a vendor from a list a vendors. From the vendor list window you may select the More info button to view the full data about the vendor. You may also access vendor history from the Options menu |
|
Format |
6 characters. There is no default in character mode. In graphical mode the default is "First" and "Last" respectively |
|
Example |
Press <F2> at both fields. |
Your answer here determines whether comments will be printed.
|
Format |
Check box where checked is yes and unchecked is no. The default is unchecked |
|
Example |
Check the box |
Make any needed changes. Upon pressing <Enter> with this field blank, the Purchasing Addresses list will be printed.
Select OK to print the report or Cancel to not print.